Replacing Faculty Staff Directory
Faculty Staff Directory is a venerable Plone add-on that integrates with Plone’s users and groups infrastructure and provides content types for creating and organizing personnel directories within educational institutions. It adds academic profile information such as job title and contact details, and provides an area for personnel to add their own bibliographies, as well as pages and other content. Faculty can be associated with departments, committees and specialties, and these groupings can then be used to control access and editing permissions throughout the site.

Originally released in 2007, FSD is an “old-style” Archetypes add-on that is currently in use by many universities and colleges. As Plone moves away from Archetypes and embraces the Dexterity content type framework, the Plone community needs to decide what to do about old but important add-ons like FSD.
A group of concerned Plone citizens convened an open space at the Plone Conference last October to discuss this. There was clear consensus on the way forward: replace FSD with a Dexterity-based add-on and provide a migration path for existing FSD content. We also agreed that the new FSD should be based on an existing add-on rather than starting from scratch, and we identified several existing add-ons as potential candidates:
- collective.contact.core
- collective.contacts
- ibme.persondirectory
- collective.roster
- collective.workspace
Two months later, Jazkarta was tasked with recommending a replacement for an FSD-like custom add-on that was developed at NYU’s Institute for the Study of the Ancient World to manage faculty information.

This provided the perfect opportunity to assess the above set of candidates.
Cris Ewing did the evaluation and concluded that collective.roster is the only package suitable as the basis for an FSD replacement. collective.contact.core does not allow the extended profile data that is needed. collective.contacts is Archetypes-based. ibme.persondirectory is a bit too bare-bones and does not provide enough of a starting point to be reasonably useful on its own. collective.workspace is more like a building block (for example see this post about using it to build a badge system), and is discussed further below.
collective.roster is dexterity-based so features can be easily added with behaviors. It has a nice viewlet-based system for extending views. It can use dexterity.membrane to provide integration with Plone’s membership system. Groups are currently implemented as a simple keyword behavior, but it could use collective.workspace to group-based rights management.
In short, we have a winner in collective.roster. Instead of implementing a specific use case it provides an easy way to add features via behavior add-ons. This building block approach is what gives the Dexterity framework its power. The next step on the path to replacing Faculty Staff Directory will be to combine collective.roster, dexterity.membrane, collective.workspace, and other add-ons to provide the FSD features that users rely on.
Adding SCORM packages to Open edX via SCORMCloud and LTI
Do you want to be able to use existing training content in an Open edX course? SCORM – the “Sharable Content Object Reference Model” – is a set of interoperability standards for e-learning software that governs how online learning content and Learning Management Systems (LMSs) communicate with each other. It allows units of online training material to be shared across e-learning systems.
Open edX doesn’t support SCORM natively yet, but here at Jazkarta we’ve successfully integrated SCORM Cloud and Open edX. SCORM Cloud is a third party service that wraps e-learning content in a SCORM dispatch package that can be embedded into an LMS. The gist of this integration is as follows:
- Export a learning module from your e-Learning authoring tool as a SCORM package.
- Upload SCORM package to SCORM Cloud.
- Configure SCORM Cloud dispatch to serve them up as LTI (Learning Tools Interoperability) components.
- Use the LTI component in Open edX to add these packages, which are actually being hosted on SCORM Cloud.
The user doesn’t need to login again as this is transmitted via LTI, and the activity is passed back into edX for grading purposes.
Here is a detailed how-to for people who would like to duplicate our work. I found some sample courses in this blog article and used the “Picture Perfect_Simulation Sample” course. Open that course in Adobe Captivate and follow these instructions for prepping, uploading, and using this sample in Open edX. (You can download Adobe Captivate 8 here – a free 30 day trial is available by clicking the ‘Try’ link on that URL.)
Mark interactive elements as graded and assign points
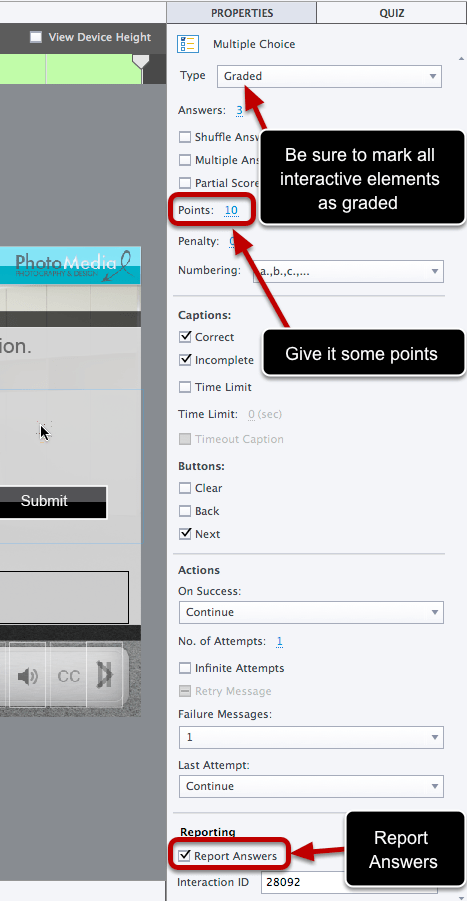
For each interactive element that you want graded, you need to click on the element, click on the Properties icon (in the upper right corner of the screen), mark it as graded in the properties panel, assign a point value that will count towards the grade, and check the Report Answers checkbox.
Set project end action to close project

In Publish Settings -> Project -> Start and End, set the Project End Action to “Close project” (I think it defaults to Stop project). That way the window showing the assessment will automatically close when it’s done playing.

In Publish Settings -> Project -> Quiz -> Reporting, set the Standard form to SCORM 2004, and then click the Configure button.
Give the course an identifier and title

You can optionally give your course an identifier and title. If you skip this step, then all of your courses will have the default identifier “Captivate E-Learning Course” and it will be hard to differentiate between the different courses.
Export from Captivate
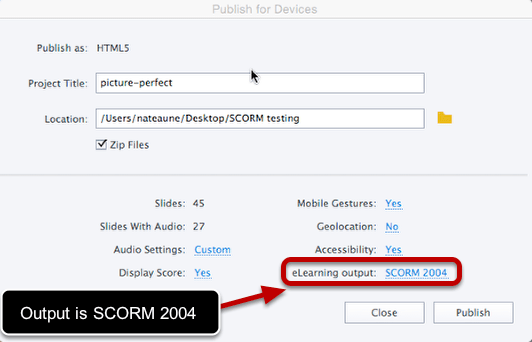
From the File menu, choose Publish… and make sure the eLearning output value is set to SCORM 2004, which you should have already set in the previous step. Click the Publish button and it will create a .zip file in the location you specified.
Upload to SCORMCloud

Create a free account at SCORMCloud.com and from the Add Content section of the dashboard, upload the .zip file that you just created.
Tell SCORM Cloud to make it available via LTI
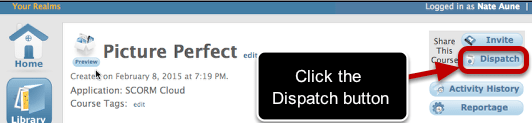
Once the content has been uploaded, you need to create a dispatch that will be used to make it available via LTI.
Create a dispatch
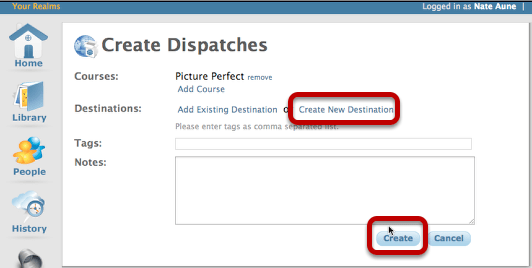
If the first time, click Create New Destination.
Create a destination

Enter ‘Open EdX’ as the name. On subsequent times you can click Add Existing Destination and choose Open EdX. This name can really be anything – it doesn’t need to be ‘Open edX’.
Export dispatch as BLTI
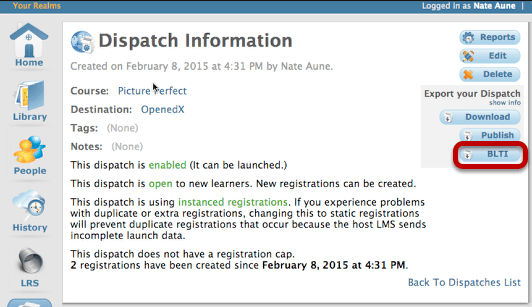
From the Dispatch screen, click on the Dispatch that you just created, and under Export your dispatch, click the BLTI button
Capture the BLTI information
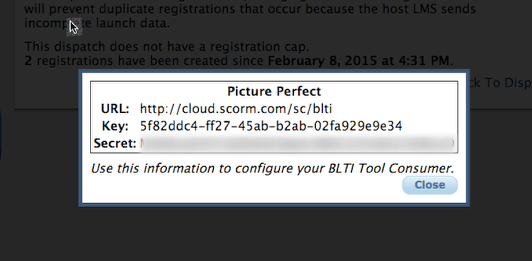
You should see a pop-up with information about the BLTI endpoint URL, key and secret key. Make a note of the URL, Key, and Secret that it displays
Enable LTI in your Open edX course

Login to edX Studio and go to your course, and select Settings -> Advanced Settings. For the Advanced Module List, add “lti” to enable adding LTI components to your course.
Add an LTI passport entry

On the same Advanced Settings page, scroll down to the section entitled LTI Passports, and add a new entry in the form:
lti_id:client_key:client_secret where the client_key and client_secret are the key and secret that you got when you made the BLTI dispatch in SCORM Cloud. The LTI ID can be anything (no spaces) – it’s just an identifier that will be used when we add an individual LTI component to our edX course.
So for our last example, it would be:
[
“pictureperfect:5f82ddc4-ff27-45ab-b2ab-02fa929e9e34:MHDEcqX4HTz6ZOk6FJNpdxxxxxxxxxxxxxx”
]
Note: you need to add a new entry for each course in SCORM Cloud that you want to embed in an edX course. It’s annoying that this is an extra step required for each item. Open edX assumes that an LTI provider will have one key/secret combo for all courses, but SCORM Cloud uses a different one for each course.
Add a new LTI component in your course
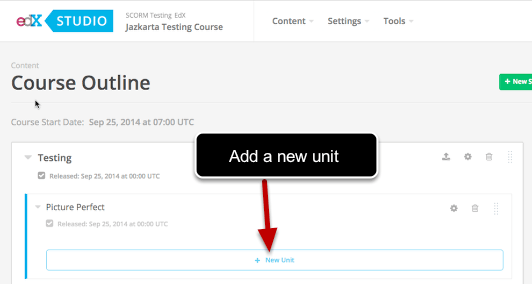
Go to your course outline: Content -> Outline and navigate to where you want to add the LTI component containing your SCORM Cloud exercise/quiz. Click the New Unit button.
Add an advanced component
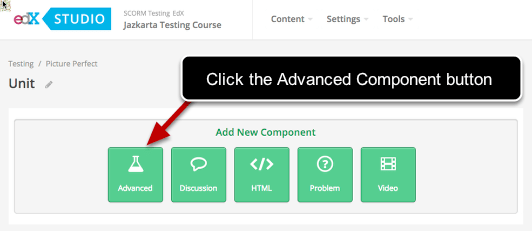
If you’ve enabled Advanced Components for your course, you should see the Advanced Component button appear when you add a new unit.
Choose the LTI component

Edit the component to set the values

Configure the LTI component settings
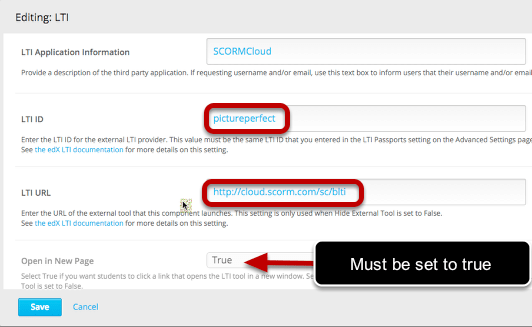
For LTI Application Information, you can type “SCORM Cloud” or whatever you want in this field. For LTI ID, this needs to match exactly, the LTI ID that you used in the LTI passports entry. The LTI URL for SCORM Cloud should be set to http://cloud.scorm.com/sc/blti
The Open in New Page setting should be set to True.
More LTI component settings

Make sure that you set Scored to be True and assign a weight that you want it to have on the total grade. You can also set a Display Name if you want.
Preview or Publish your changes
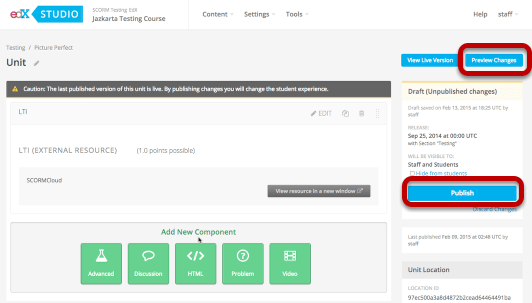
Once you’ve added the component, you need to click the Preview Changes button or Publish it to your course.
Login as a student and try the exercise
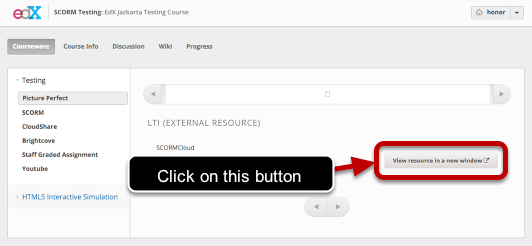
Now we can login as a student and test it out. When you navigate to the page, there is a link “View resource in a new window”. Click on this button to launch the SCORM Cloud exercise in a new window.
Take the exercise
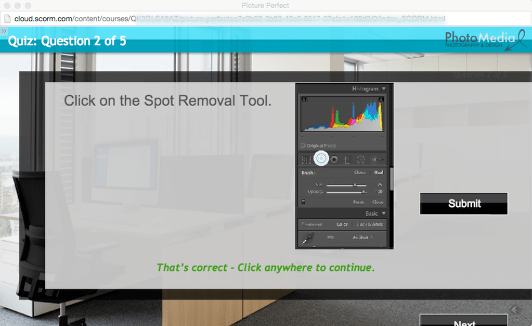
You then take the exercise and SCORM Cloud is tracking your activity.
Complete the exercise

At the end of the exercise, it will compute a score for you, and if the score is above the threshhold to get a passing grade, then get a “Pass” grade.
See score in edX progress page
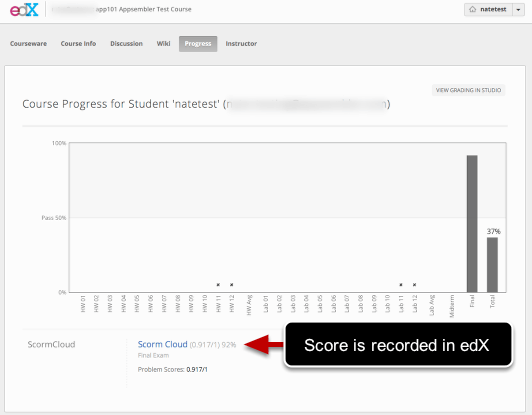
This grade is sent back into edX and can be seen on the student’s Progress page. Please note that these scores don’t match because I took a screenshot of a different student.
Caveats
1. Make sure that your Open edX site is at an internet address that can be reached by SCORM Cloud. This means basic auth must be disabled and if you’re using SSL, that you have a real SSL certificate, not a self-signed certificate.
2. A fix to the edX code which parses the SCORM Cloud request handle a non-standard (well, old standard) XML namespace that it uses. https://github.com/jazkarta/edx-platform/commit/ebcf93002557176102df2bf93ab79a979aaf0fba
3. A fix for edX’s validation of the oauth signature (https://github.com/edx/edx-platform/pull/5016)
Get involved
We invite you to join the conversation on the edx-code mailing list about SCORM support in edX, and feel free to reach out and contact us if you are looking for professional help with edX.
Or if you want to take Open edX for a test-drive, you can get a free trial from our partner Appsembler.


